
Sending e-mails makes our lives easier on many occasions, especially in work or academic environments, since it allows us to send documentation in a single file and to communicate very easily in cases of extreme urgency, for example. But have you ever experienced email error 550 when trying to send an email?
If this has happened to you, it’s quite possible that you did not know what to do or what steps to follow, which is completely normal. But don’t worry; we’re here to help you.
If you want to know in depth what the 550 email error in your email is, what it’s caused by, and how you can fix it, you’re in the right place. Keep reading this post until the end, and don’t miss anything, as we will easily help you to recognize and solve it in very simple steps.
What Does Email Error 550 Mean?
You may have tried to send an email at some point and encountered an alarming message which says, “550 Requested action not taken: mailbox unavailable”, usually. Well, this error, according to RFC 5321, is the standard form of the SMTP 550 code, which, in most cases, means that the requested action could not be executed and that the e-mail address to which we want to send an e-mail is not available.
Although this clearly indicates the origin of the problem, there may be other causes, as we will see later on.
As we said, the most common message that may appear on your screen is “550 Requested action not taken: mailbox unavailable”, although there are other messages that may frequently appear when this error is displayed, which may include:
- 550 User unknown: This message indicates that the e-mail address we’re trying to communicate with most probably doesn’t exist or is misspelled.
- 550 Mailbox not found: Same as the previous case, possibly an error when writing the other person’s email.
- 550 Relay not permitted: This message means that the recipient’s server doesn’t allow the server being used to send the e-mail.
- 550 Reject due to policy restrictions: Through this message, we can know that our e-mail has been blocked by the e-mail security software since it considers that our address is randomly generated or is reported as spam.
- 550 Invalid address: Like the first two messages, this one indicates that the address we’re trying to communicate with is invalid.
- 550 User has too many messages on the server: In case you didn’t know, mailboxes have a limit of mails you can send per hour, and, as difficult as it may seem, if you exceed this limit, this 550 message will be displayed.
- 550 Permanent failure for one or more recipients: This message will be displayed when our email server or the other person’s server has our email address or IP listed in the DNS blacklist.
- 550 This domain is not hosted here: This message is different from the first two, and although it may indicate something else, the truth is that it only tells us the mailbox we’re trying to communicate with doesn’t exist.
- 550 Authentication is required for relay: SMTP authentication missing
- 550 Quarantined: This message will indicate that the message we sent was quarantined or put on the spam list of the mailbox we’re trying to communicate with, most likely because our address is added to a DNS blacklist.
- 550 Administrative Prohibition: This can mean that the SMTP server is on a DNS blacklist or that the SMTP server is using a dynamic IP address (VPN).
This variety of messages means the same thing, in simple words, only that they may change depending on the mail service we use.
What Is the Reason for Email Error 550?
The 550 email error displayed on your screen when you want to send an email can be due to two main causes, one of them most likely caused by a typing error on our part.
- The e-mail address we’re trying to communicate with is not valid (try to check if the e-mail is well written and if there are no spelling mistakes in it), is suspended, or, due to an error, the sent mail is identified as spam by the recipient’s email inbox.
- Technical reasons:
- No permissions to use SMTP (Simple Mail Transfer Protocol).
- The mailing request was rejected because it doesn’t comply with the mailing policies.
- The e-mail client is being used from a different IP address.
- Your Internet firewall mistakenly identified your email as spam or possible phishing.
What Is SMTP?
As you may have read earlier, we’re referring to SMTP, which stands for Simple Mail Transfer Protocol, but what exactly is this protocol?
In basic human terms, an SMTP protocol is a network protocol that simply allows the e-mails we send or receive to travel over the Internet. This is why it’s known as the indispensable channel for e-mail communication. Its failure, therefore, results in an error 550.
To simplify it, the SMTP would be the “electronic letter carrier” that carries mail from one point to another, but, for this, you have to corroborate that both sender and receiver are real, that is to say, that their mailboxes exist. Failure at either end, for example, the incorrect inclusion of the mailbox of the person to whom we want to send an e-mail, can also cause an error 550.
How to Prevent Email Error 550?

Luckily, there are ways to prevent error 550 from appearing in our system when we want to send an email, and there are several ways, many of them trying to verify that our account is not being used fraudulently to send spam, as you’ll see next.
Review outgoing e-mails
As we mentioned, there may be a possibility that our account is being used to send spam e-mails, either because the security of our address has been breached or because our mail has been intercepted, which can happen in several cases.
To avoid this, check the e-mails sent by your account; if you notice any irregularities, such as spam e-mails that you did not send yourself, try setting up an anti-spam system or, failing that, use the following method.
Change the password
In case your account security has been breached and is at risk of being reported as a spam account, the easiest thing you can do is to change the access to it using a different password than the one you have been using and, if possible, providing a recovery e-mail.
To choose your password, choose something that not everyone can know, try to vary between uppercase, lowercase, numbers, and special characters, and don’t include sequences of numbers such as 123.
Limiting the number of outgoing e-mails per hour
Most e-mail services can limit the number of e-mails that can be sent per hour in the case of an account shared by a workgroup. Try to limit this amount to less than 50 per hour; this will significantly reduce the risk of your account being flagged as spam account.
In case they have logged into your email account to send spam, limiting the number of emails per hour will also help to prevent error 550 from showing up in your system.
If you want to know how to avoid being flagged as a spam account, check out this post.
Use a firewall for web applications
If you want to fully protect yourself against spammers, the best thing you can do, in addition to changing your password, is to use a web application firewall that fully protects your system from the vulnerabilities that attackers use to get into your email.
Blocking direct outgoing connections to SMTP servers
Spam scripts may attempt to connect directly to remote SMTP servers; by blocking such connections and limiting them only to local servers, i.e., mail servers, you’ll avoid at all costs that someone uses your account from another place to which you don’t have access.
In addition, this will also help you control the volume of emails sent per hour, as well as help you to take immediate action in case you have noticed anything suspicious in recent movements.
Scan for malware in mail file uploads
The last measure we recommend is to periodically (or every time an e-mail is sent) scan the files sent with an e-mail; sometimes, spammers use this method to send, along with spam messages, files that can damage the other person’s computer if that person opens them.
How to Fix Email Error 550? Possible Solutions

Here, we come to, perhaps, the most important part of the whole post, as this is where we will see exactly how to fix the 550 error that is displayed when you try to send an email.
1: Check that the e-mail you’re trying to send an e-mail to is spelled correctly
First and foremost, before moving on to more complex configuration issues, ensure that the email address you’re trying to send an email to is spelled correctly. On many occasions, when we try to send an email to an @gmail or @outlook email address, we can make the mistake of typing @gamil or @outlok wrongly. This will cause the email to be rejected, and the error 550 notification will arrive.
2: Try to send the mail later
There is also the possibility that the recipient’s e-mail server is temporarily disabled or malfunctioning; in this case, there is no other option but to inform the destination that the mail cannot be sent for this reason, so all that remains is to wait for the server to become active again and send the mail later.
3: Make sure your email address is not identified as spam.
Sometimes, your email address may have been incorrectly identified as spam. You’ll be able to tell if this is the case because when you receive the 550 error message, it’ll say “550 Reject due to policy restrictions”, giving a clear signal that the email sent violates the email provider’s policies, not because of what is inside, but because of the status of our address.
You should go to the Spamhaus Blocklist Removal Center website to determine if your email address is flagged as spam. Once on the page, enter your address in the “Enter a Domain name” search box. Click on the “Lookup” button, and after a few seconds, you’ll be shown whether or not your email is identified as spam.
In case it is, you should automatically contact your e-mail provider, whatever it is, and try to find a solution to the problem.
4: Check if the IP of the email is blacklisted
If your e-mail IP is, once again, wrongly blacklisted, it’s likely that both the emails you try to send and receive will be automatically bounced back under the error 550 banner.
Want to know how to check if your IP is on a DNS blacklist? You must log in to the mxtoolbox website, enter your email or IP address, and check if it’s blacklisted. It is good to know that our email warming service automatically informs you if you are blacklisted.
If your IP was flagged as dangerous and included in a DNS black list, it means that someone exploited the vulnerability in the webmail application and is loading a spam script into it or, alternatively, that someone has access to your e-mail account and is using it as a tool to send spam messages.
5: Change the outgoing mail port
In some cases, the mail server may automatically identify our mail as spam if we send it from mail port 25 since it’s the most used to send spam mail. To change the outgoing mail port, you must:
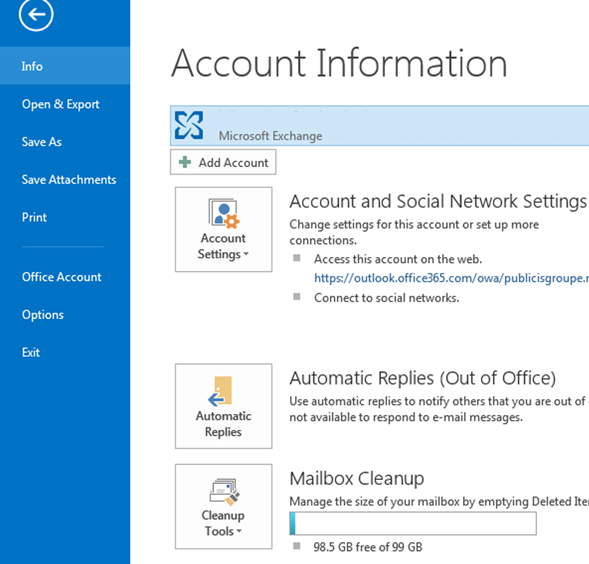
- Go to “Information”, “File”, or “Tools” and then to “Account Settings”.
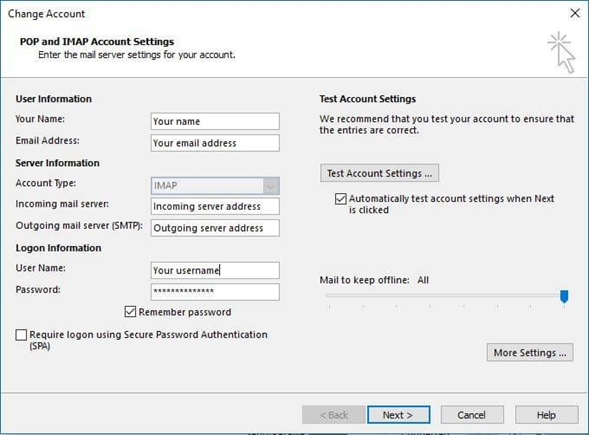
- Go to “More configuration options” and then to “Advanced options”.
- In the “Advanced Options” tab, click on the SMTP option.
- There, change the port from 25 to 26, 465, 587, or 2525.
6: Review SSL method issues
Most email clients, whether Outlook or Gmail, use an auto-discovery function to configure the SMTP server. This can sometimes cause some errors, which can be avoided by automatically configuring the SMTP (we’ll explain how to do this later).
Among its settings, apart from the ones we will see, we recommend you analyze the ones related to the SSL method, including the options of:
- No SSL method
- SSL/TLS
- STARTTLS
You can try any of these three options and analyze whether or not the error 550 is resolved; in case it doesn’t, here are the last two options available to you.
7: Configure the outgoing mail SMTP server
The last option we can give you to solve the error 550, in case you haven’t yet been able to find a solution to this problem using the recommendations provided, is to manually configure the SMTP server, following these very simple steps.
In Outlook:
a) Go to your account settings
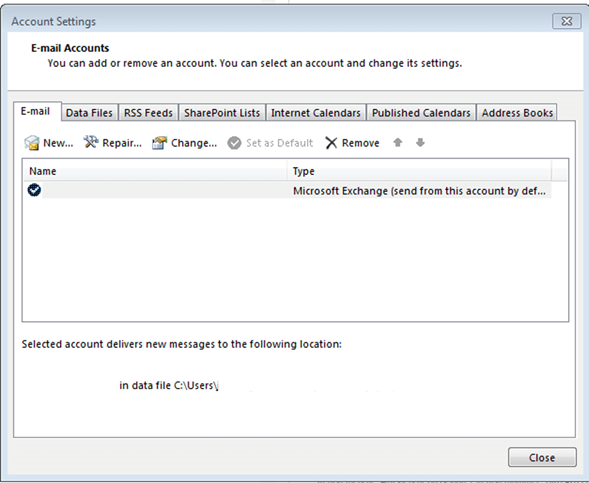
b) Once you have opened the configuration, specifically select the account in which you want to modify the SMTP settings, and then click on “Change”.
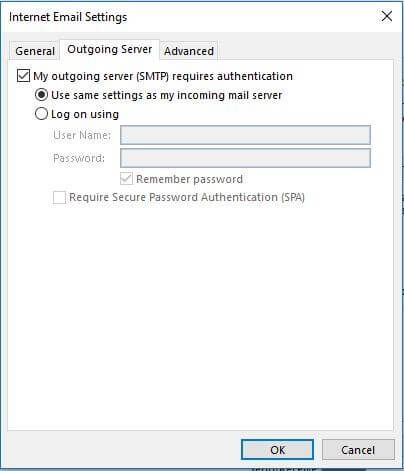
c) Then, you’ll find all your account information, such as user name, password, etc., so you should click on “More settings” and then “Internet e-mail settings”.
d) Finally, locate the “Outgoing Server” tab. In case it’s not checked, click on the option “My outgoing server (SMTP) requires authentication” to activate it. Check also the option “Use the same settings as my inbox”.
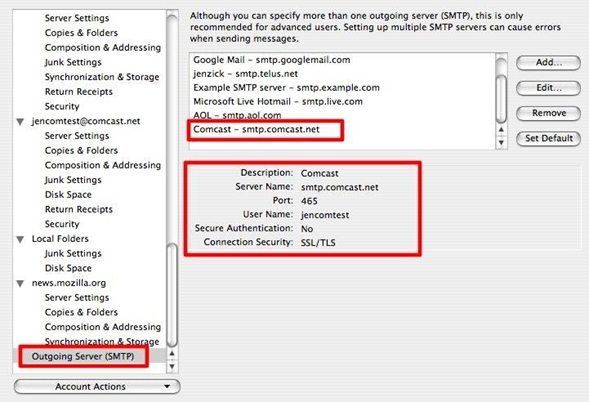
In Mozilla Thunderbird:
- Click on “Tools” and then on “Settings”.
- There, choose the “Outgoing Server (SMTP)” option and click on “Edit”.
- Choose the SMTP server you want to configure and click again on “Edit”.
- Add your username and password.
- Click on “Accept”.
8: Contact your ISP
In case none of the above options have worked for you (which is usually quite rare), we recommend contacting your internet service provider, which may provide a solution to the 550 error.
They can also give you some information about file movement or access to your mail within your network, mainly because spammers often connect from remote servers, which is difficult to know on a regular basis.
In addition, there is the option of contacting a computer security service, although, in most cases, any of these 7 options above should work for you.
Conclusion
As you have seen in this post, the error 550 in your email is not really frequent, especially if you have a personal account; on the other hand, if you have a corporate email used by several employees, security may be somewhat compromised.
Primarily, error 550 may be due to a typing error in the email box to which we’re trying to communicate, so if you see this error when you want to send an email, first make sure you have typed the other person’s email address correctly. If this doesn’t work, there is nothing to be alarmed about since, as you have already seen, several causes can lead to this error.
To ensure you don’t suffer from this kind of inconvenience, we recommend you use personal email accounts and, if possible, always try to use a firewall and have security activated to the maximum. This will reduce as much as possible the 550 errors that can be displayed in our browser.
Frequently Asked Questions
When an email bounces due to Error 550, you will typically receive a non-delivery report (NDR) or bounce-back message indicating the specific error code 550.
In many cases, you can resolve Email Error 550 by taking appropriate actions, as outlined in the above article. However, if you encounter difficulties, technical support from your email service provider may be necessary.
The resolution time can vary depending on the specific cause of the error and the actions taken. Some issues can be fixed quickly, while others may require more time and effort.
To prevent Email Error 550 in the future, maintain good email practices, regularly monitor your sender reputation, keep your DNS settings up to date, and promptly address any bounce-back issues.
Check Recipient Email Address, Verify Domain and SPF Records, Check Sender Authentication, Reverse DNS Lookup, Review Content and Attachments and Check for Blacklisting